Mastering PostgreSQL Row-Level Security (RLS) for Rock-Solid Multi-Tenancy
How to Safeguard SaaS Data from Cross-Tenant Leaks by Enforcing Strict Tenant Isolation at the Database Layer

Multi-tenancy can be a minefield for platforms that serve multiple customers from a shared code base and database. One small mistake, such as forgetting a tenant filter in an SQL query, can expose customer A’s data to customer B, which is every SaaS founder’s worst nightmare.
In the early days of SaaS in 2009, while working with a large telecommunications company in Germany, I learned that strong tenant isolation is best enforced close to the data itself. This is where PostgreSQL Row-Level Security (RLS) comes in.
In this article, I will discuss how PostgreSQL RLS works in detail, demonstrate its setup with a simple example, and examine its application to views and stored procedures. You’ll see how RLS provides a secure-by-default data layer that significantly reduces the risk of cross-tenant data leakage.
Why Row-Level Security for Multi-Tenancy?
Multi-tenancy means a single application (and database) serves multiple customers (tenants), each expecting their data to remain invisible to others. The challenge in a shared database model is ensuring every query and command is scoped to the right tenant. Relying on application code to add a where-clause like WHERE tenant_id = … everywhere is very fragile. One mistake in a query and sensitive data could be leaked. As one AWS engineer neatly put it in a blog post, you want to enforce tenant isolation centrally instead of leaving it to “the everyday variability of your source code.”
This is where Row-Level Security comes in: by enforcing tenant-specific policies at the database level, RLS ensures isolation even if application code misses a filter.
PostgreSQL Row-Level Security, introduced in PostgreSQL 9.5, directly addresses this problem. RLS allows you to define security policies on a table such that every SQL operation (SELECT, INSERT, UPDATE, DELETE) is automatically filtered according to those policies. In a multi-tenant application, we can create a policy that says “a row in this table is only visible if tenant_id matches the current tenant’s ID.” The database then enforces that rule for every query, no matter if a developer forgot to add a filter in code. If a query doesn’t satisfy the policy, the database behaves as if those rows don’t even exist.
In practical terms, RLS gives us defense in depth: even if our code has a bug, the database won’t return or modify data outside the tenant’s scope. This flips the multi-tenancy model to a safer default. Instead of hoping every developer remembers to include tenant conditions, we guarantee at the database level that cross-tenant data access cannot happen. Every SQL statement is automatically tenant-aware, so developers can write queries focusing on business logic, while Postgres handles the tenant isolation details.
Let’s contrast RLS with two other approaches I’ve seen (and used) for multi-tenancy:
Separate Schema or Database per Tenant
In this silo model, each tenant’s data lives in its own schema or database. This provides strong isolation (tenants never share tables), but at the cost of huge operational complexity in managing potentially hundreds of schemas or databases, performing migrations across them all, and increased infrastructure overhead. It can be a good approach for a handful of large tenants, but it doesn’t scale well to many small tenants or speedy deployments.
Discriminator Column (Tenant ID in Tables)
This is the classic shared-database approach: add a tenant_id column to every table and ensure every query filters by it. Simpler to set up and cost-efficient, but puts a lot of responsibility on developers and ORM mappings. Missing a filter in one place can be disastrous. You can mitigate this with patterns like global query filters or interceptors (I’ve written about using EF Core’s shadow properties to stamp tenant_id automatically), but it still feels like placing a critical security control in application logic.
RLS combines the best of both worlds.
It lets you keep a single, shared schema for all tenants (easy to deploy and scale) while centralizing the tenant filtering in the database engine. In other words, you get the operational simplicity of the shared model with a security guarantee approaching the silo model. The application can use one Postgres role for all tenants (so connection pooling is straightforward), and we tag each session or transaction with the tenant’s ID. The RLS policy then ensures each session sees only its tenant’s slice of the data. There’s “zero chance of forgetting a tenant filter” in code because Postgres itself won’t allow a cross-tenant query.
Under the Hood: How Does RLS Enforce Tenant Isolation?
In PostgreSQL, RLS policies revolve around roles and conditions. The general process looks like this:
- You create one or more database roles (e.g. an ‘app’ role for your application) that do not have the BYPASSRLS privilege. This ensures that the role is subject to RLS policies, rather than ignoring them.
- You enable RLS on a table by running ALTER TABLE <table> ENABLE ROW LEVEL SECURITY;.
- You then create one or more policies that define the allowed rows for each operation (SELECT, INSERT, UPDATE, DELETE). These policies check something like a tenant_id column against a session-specific context to ensure that only rows belonging to the current tenant are visible.
RLS effectively adds an automatic WHERE clause to every query the role executes. If a policy says tenant_id = current_setting(‘app.current_tenant’), Postgres will internally translate any statement (e.g. SELECT * FROM assets) into:
SELECT * FROM assets
WHERE tenant_id = current_setting('app.current_tenant')::uuid;
… without requiring the developer to write that condition in the application code.
But how do we tell the database which tenant is “current” for the session or transaction?
Using Custom GUC Variables for Tenant Context
While you can assign different database roles to each tenant and use something like SESSION_USER in your policy, this approach can become unwieldy if you have many tenants. Instead, a more flexible method is to rely on PostgreSQL’s own runtime parameters, also known as GUC (Grand Unified Configuration) variables.
Define a custom variable namespace, such as app.current_tenant At the start of each request (or transaction) in your application, set app.current_tenant to the ID of the tenant making that request. The RLS policy references current_setting(‘app.current_tenant’) to enforce row-level constraints.
RLS Setup Example
Let’s say we have a table called Assets, which stores equipment or resources that belong to different tenants. This example is taken from my asset tracking/geofencing venture that I am currently working on. Each row in this table has a tenant_id that identifies the tenant that owns that asset.
-- 1. Table and Policy Setup
CREATE TABLE assets (
    id           UUID PRIMARY KEY,
    tenant_id    UUID NOT NULL,
    name         TEXT NOT NULL,
    description  TEXT,
    status       TEXT NOT NULL,
    created_at   TIMESTAMPTZ NOT NULL DEFAULT now(),
    updated_at   TIMESTAMPTZ NOT NULL DEFAULT now(),
    retired_at   TIMESTAMPTZ
);

-- 2. Enable RLS
ALTER TABLE assets ENABLE ROW LEVEL SECURITY;

-- 3. RLS policy: only allow access to rows
--    where tenant_id matches the current_tenant setting
CREATE POLICY assets_tenant_isolation ON assets
    USING (tenant_id = current_setting('app.current_tenant')::UUID);

-- 4. Ensure new inserts have the correct tenant_id
CREATE POLICY assets_tenant_insert ON assets
    FOR INSERT
    WITH CHECK (tenant_id = current_setting('app.current_tenant')::UUID);
With these policies in place, the assets_tenant_isolation policy applies by default to all SELECT, UPDATE and DELETE statements, ensuring that any row retrieved or modified must satisfy tenant_id = current_setting(‘app.current_tenant’). The assets_tenant_insert policy applies to INSERT statements. It ensures that newly inserted rows have a tenant_id that matches the current tenant context. If the INSERT attempts to use a different tenant_id, the database will reject the operation.
Important Notes for Production Environments
You need to ensure that the app.current_tenant variable is always set and reset appropriately in a connection pool environment. When a connection is reused for multiple tenants across different requests, you want to avoid a scenario where the previous tenant’s ID is still set. A common approach is to call
SET LOCAL app.current_tenant = ‘…’
at the start of a transaction, which will automatically clear the variable at the end of the transaction. Alternatively, you can manually RESET app.current_tenant after processing a request.
Populating Test Data
For demonstration, let’s insert sample assets for two different tenants, identified by their UUIDs:
INSERT INTO assets (id, tenant_id, name, description, status)
VALUES
('f47ac10b-58cc-4372-a567-000000000001','11111111-1111-1111-1111-111111111111','Forklift FL-100','15-ton capacity','active'),
('f47ac10b-58cc-4372-a567-000000000002','11111111-1111-1111-1111-111111111111','Truck TR-200','GPS-enabled heavy-duty truck','active'),
('f47ac10b-58cc-4372-a567-000000000003','11111111-1111-1111-1111-111111111111','Container CT-300','Refrigerated shipping container','active'),
('f47ac10b-58cc-4372-a567-000000000004','11111111-1111-1111-1111-111111111111','Pallet Jack PJ-400','Manual pallet jack','retired','2025-03-15T10:00:00Z'),
('f47ac10b-58cc-4372-a567-000000000005','11111111-1111-1111-1111-111111111111','Drone DR-500','Aerial inventory drone','active'),
('f47ac10b-58cc-4372-a567-000000000006','11111111-1111-1111-1111-111111111111','AGV AG-600','Automated guided vehicle','retired','2025-04-01T12:00:00Z'),

('f47ac10b-58cc-4372-a567-000000000007','22222222-2222-2222-2222-222222222222','Delivery Van DV-110','Electric delivery van','active'),
('f47ac10b-58cc-4372-a567-000000000008','22222222-2222-2222-2222-222222222222','Pallet Jack PJ-210','Electric pallet jack','active');
Now we have two sets of assets for two different tenants. If RLS is configured correctly, each tenant should only see their own rows if we set the correct app.current_tenant value.
Creating and Using the “app” Role
To demonstrate how RLS is enforced at the role level, let’s create a dedicated Postgres role that our application will use. In many production setups, your application will connect to a single database user or role that’s what I want to illustrate here.
CREATE ROLE app LOGIN PASSWORD 'p@ssw0rd' NOINHERIT;A few things to note here. LOGIN makes the role usable for client connections. It is critical not to grant BYPASSRLS. Any role with BYPASSRLS set to true would ignore the RLS policy, defeating its purpose. NOINHERIT means that if this role is granted membership in other roles, it won’t automatically inherit their permissions. This helps to keep our permission scheme tight.
Next, we can set a default for app.current_tenant to an empty string or any other default:
ALTER ROLE app SET app.current_tenant TO '';Then we adjust privileges on the schema and table so that this new role can interact with the data:
REVOKE ALL ON SCHEMA public FROM PUBLIC;
GRANT USAGE ON SCHEMA public TO app;
GRANT SELECT, INSERT, UPDATE, DELETE ON assets TO app;
Using the “app” Role in SQL Sessions
Now let’s simulate a session where we act as the app role, set a tenant context, and run queries:
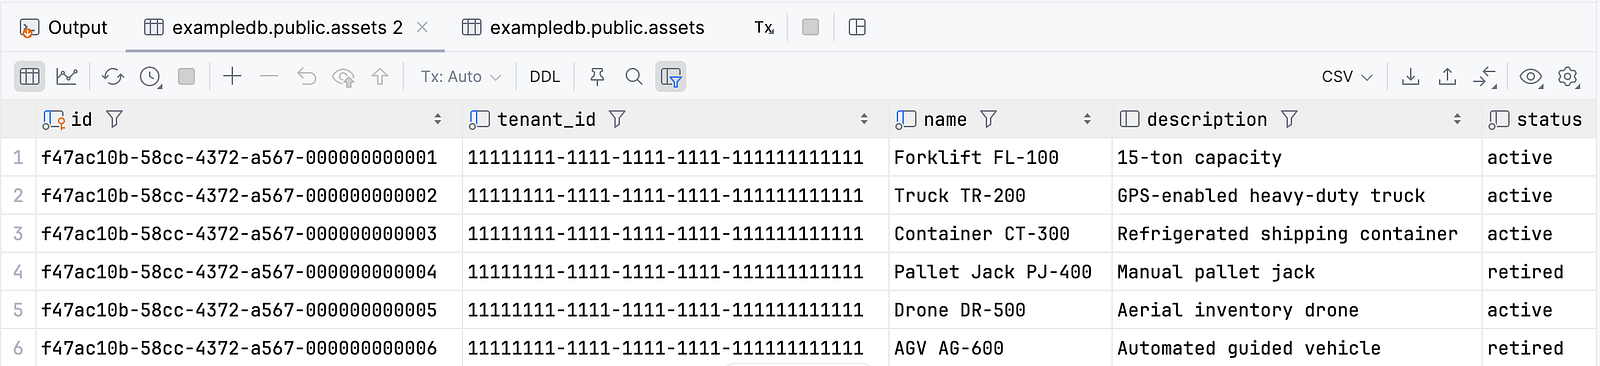
SET ROLE app;
SET app.current_tenant TO '11111111-1111-1111-1111-111111111111';

SELECT * FROM assets;
With this setup, the query should only return rows matching tenant as we can see here in the result output.
If we switch to the second tenant:
SET app.current_tenant TO '22222222-2222-2222-2222-222222222222';
SELECT * FROM assets;s
We’ll only see that tenant’s records. And if we specify a non-existent tenant ID or forget to set app.current_tenant, the result will be empty. It’s exactly what we’d expect from a robust isolation policy.
Working with Views and RLS
As discussed, RLS significantly simplifies multi-tenancy by centralizing tenant isolation. However, special considerations apply when you use database views or stored procedures. By default, a PostgreSQL view runs with the privileges of its creator (usually a superuser or table owner). This means views owned by roles with the BYPASSRLS privilege, such as a superuser like postgres in the example, will completely bypass Row-Level Security policies.
Let us create a simple active_assets view, as shown below:
SET ROLE postgres;
CREATE VIEW active_assets AS
SELECT id, tenant_id, name, status
FROM assets
WHERE status = 'active';
With this setup, querying the view will unexpectedly return all tenants' rows, ignoring RLS policies.
SET ROLE app;
SET app.current_tenant TO '22222222-2222-2222-2222-222222222222';
SELECT * FROM active_assets;
This happens because the view executes with the privileges of its owner (the superuser), effectively bypassing RLS. Let's fix the view to enforce RLS and ensure that it only returns the expected rows of the current tenant.
Make the view execute with the privileges of the the invoker.
SET ROLE postgres;

ALTER VIEW active_assets
  SET (security_invoker = true);
With this, when querying as the app role, RLS policies are correctly enforced.
It's essential to double-check the ownership of your views. Unintentionally having views owned by superuser roles can lead to bypassing RLS, potentially causing serious security issues.
RLS Enforcement per Request Cycle
In a typical SaaS architecture, each incoming request arrives with a known tenant identifier, for instance from a JWT token. The application can then run something like:
BEGIN;
SET LOCAL app.current_tenant = 'some-tenant-uuid';

-- Execute the needed SELECT, INSERT, UPDATE, or stored procedures
-- RLS automatically applies the correct tenant filter.

COMMIT;
Using SET LOCAL inside a transaction ensures that once the transaction ends, the tenant context resets automatically. This is crucial for safe multi-tenant environments where connections might be pooled and reused. You don’t want to accidentally “leak” the previous tenant’s context into the next request.
RLS Checklist
To make the most of PostgreSQL RLS for multi-tenancy, keep these points in mind.
Check for Superuser or BYPASSRLS Roles
RLS doesn't apply to superusers or roles with BYPASSRLS = TRUE. Make sure your application role doesn't have these privileges, otherwise your policies won't matter.
Beware of SECURITY DEFINER Functions:
A function marked as SECURITY DEFINER and owned by a superuser can bypass RLS if not managed carefully. Use SECURITY INVOKER for typical multi-tenant logic so that the caller's RLS context applies.
Performance:
RLS effectively adds an extra filtering step to your queries. Indexing your tenant_id column is crucial. Fortunately, in many multi-tenant systems, queries typically revolve around the tenant’s data anyway, so the performance overhead is often negligible.
Keep the Tenant Context Clean in Connection Pools
Explicitly set and reset app.current_tenant on each request. If you're using something like PgBouncer or a built-in connection pool (e.g. in an application server), make sure that each new request triggers a new context. Some frameworks provide hooks or middleware that you can use to do this automatically.
Auditing, Monitoring and Testing
As RLS is a critical security feature, you should consider capturing logs (e.g. via Postgres native logging or an external system). This can help you investigate suspicious queries or confirm that queries are indeed restricted to the expected tenant.
Write integration tests to confirm that cross-tenant data remains inaccessible. For example, spin up the application, authenticate as Tenant A, and ensure you cannot query Tenant B’s records. Then do the reverse. Automated tests catching a misconfiguration early can save you from a data breach.
Wrapping Up
Row-Level Security in PostgreSQL provides a secure-by-default data layer that drastically reduces the risk of cross-tenant data leaks through global database-level tenant filters. This approach centralizes data isolation, the most critical security concern, and eliminates the risk of developer oversights in queries.
Rather than depending on application code to maintain tenant_id filters throughout, the filtering happens directly in the database. Using a custom GUC variable like app.current_tenant, your application can set the tenant context for each session or transaction. The database then automatically enforces filtering for all operations (SELECT, INSERT, UPDATE, DELETE) on RLS-enabled tables.
Views, stored procedures, and functions inherently respect these security rules, maintaining consistent protection even in complex reporting scenarios.
For SaaS platforms, RLS is absolutely worth considering as your multi-tenancy foundation. Its power and flexibility can protect you from critical mistakes that could otherwise result in data breaches and lost customer trust.
As with any security implementation, test thoroughly in your environment. Monitor connection pooling carefully and restrict tenant data access to non-superuser roles only. When combined with proper indexing, auditing, and logging practices, RLS becomes a valuable asset in delivering secure, scalable multi-tenancy.
Check out the github repository to explore the setup.
Have questions about this setup? Feel free to reach out or comment, and please share your own multi-tenancy experiences.
Cheers!